3 console logs techniques every JavaScript devs should know

Here are three console log techniques every JavaScript developer should know.
First, it’s very common that you need to check the value of a variable.
But you don’t want to just log it because it will be buried in the sea of console logs you forgot to remove from the page.
So you add an identifier like this:
console.log('user name:', userName);
But it’s pretty annoying that you need to write an extra string every time.
Instead, wrap it with curly braces:
console.log({userName});
And you can achieve the same thing with less typing.
{userName: 'John'}
Second, printing objects.
Using console log to print complex objects sucks. It collapses and is hard to read.So developers often use JSON.stringify to pretty print objects.
console.log(JSON.stringify(users, null ,2))
example output:

var users = [

    {
        name: "john",
        age: 18
    },

    {
        name: "arthur",
        age: 22
    },

    {
        name: "jane",
        age: 27
    }

];
Which works great.
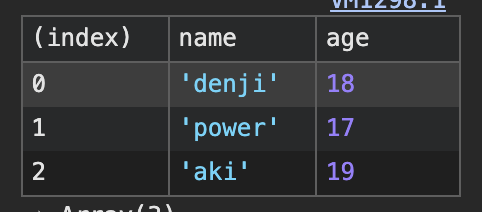
But you can take this one step further by using console table.
console.table(users);
It prints the object in a structured table format, which is much easier to scan.
Third, grouping logs.
In this program there are multiple console logs.
const userName = getUserName();

console.log(userName);

const userName = getUserEmail();

console.log(userEmail);
Instead of doing a console log here and there, it’s much more organized if you put them all in one place.
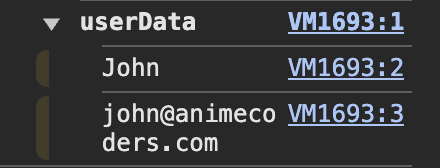
console.group('User Data');
console.log(userName);
console.log(userEmail);
console.groupEnd();
Then you can use a console group to group them.
This way, everything is nicely grouped in the console.
Get the written notes delivered to your email inbox to learn something new about javascript one at a time.